23 January 2013
How to build a simple dashboard with Salt UI
This week the guys at SaltStack cut the first developer release of Salt UI. Salt UI is a framework for building web applications that interfaces with Salt using Salt API. That might sound boring, but it is incredibly powerful, it will let you build advanced web apps to perform any sort of management, orchestration, monitoring and so forth using all the modules and functions in Salt. Salt UI is not yet a mature project yet but I wanted to see how I could build a simple self service dashboard for our company's web team.
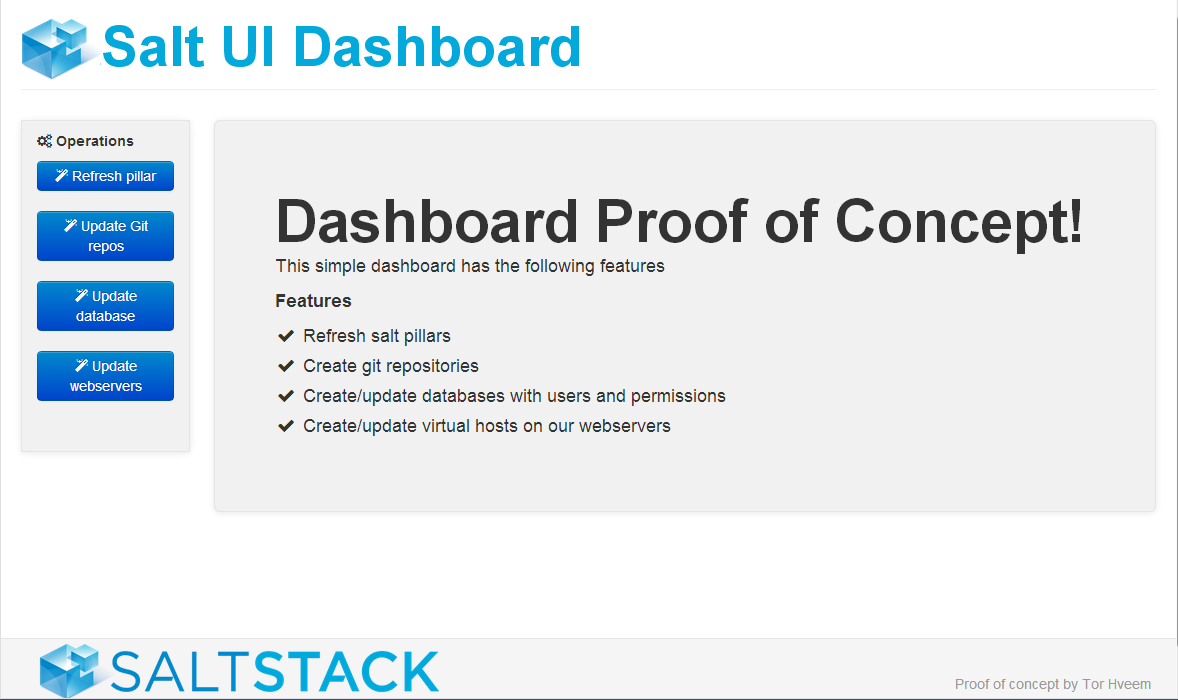
Impatient readers will want to check out the screenshots at the bottom first.
Goals
The goal is to build a simple dashboard with 4 functions.
- Refresh salt pillars
- Create git repositories
- Create/update databases with users and permissions
- Create/update virtual hosts on our webservers
Prerequisites
This howto assumes you have a working salt ecosystem, including latest git versions of salt API and salt UI. For a quick rundown over the salt UI architecture and concepts, check out this page
Salt UI changes
Hop into the git clone of Salt UI and start making changes.
First we need a new route to add the dashboard view. Open up the routes file, and add the new route called dash, which points to tmpl/dash.html
js/conf/routes.js
route_map.add('dash', {
    url: '#/dash',
    tmpl: require('text!tmpl/dash.html'),
    type: 'full',
});
Then add the dasboard HTML template. The structure is using the Bootstrap for layout. The thing to note in this html is the tag <x-dashexec>. This is a "magic" tag that we will use later on.
tmpl/dash.html
<div id="wrap">
    <div class="container-fluid">
        <div class="row-fluid">
            <div class="span12 page-header">
                <img src="/img/logo.png">
                <h1>Salt UI Dashboard</h1>
            </div>
        </div>
    </div>
    <div class="container-fluid dash-container">

        <div class="row-fluid">
            <div class="span2 sidebar dash-sidebar">
                <div class="sidebar-nav">
                    <h5><i class="icon-cogs"></i> Operations</h5>
                    <x-dashexec></x-dashexec>
                </div>
            </div>

            <div class="span10 main">
                <div class="hero-unit">
                    <h1>Dashboard Proof of Concept!</h1>
                    <p>
                    This simple dashboard has the following features

                    </p>
                    <h4>Features</h4>
                    <ul class="unstyled">
                        <li><i class="icon-ok"></i>
                           Refresh salt pillars
                        </li>
                        <li><i class="icon-ok"></i>
                          Create git repositories
                        </li>
                        <li><i class="icon-ok"></i>
                         Create/update databases with users and permissions
                        </li>
                        <li><i class="icon-ok"></i>
                        Create/update virtual hosts on our webservers
                        </li>
                    </ul>
                </div>
            </div>
        </div>
    </div>
    <div id="push"></div>
</div>

<footer id="footer">
    <div class="container-fluid">
        <img class="pull-left" width="400" src="/img/saltstack.png">
        <p class="pull-right muted credit">  Proof of concept by Tor Hveem </p>
    </div>
</footer>
Style
What good is markup without styles. We add our styles to the project in a new less file. Salt UI is using less which is a language that compiles into CSS.
Modify less/saltui.less to include dash.less:
less/saltui.less
@import "dash.less"; // Custom rules for the dashboard
And then add the styles for the dasboard:
less/dash.less
html,
body {
    height: 100%;
    /* The html and body elements cannot have any padding or margin. */
}

/* Wrapper for page content to push down footer */
#wrap {
    min-height: 100%;
    height: auto !important;
    height: 100%;
    /* Negative indent footer by its height */
    margin: 0 auto -60px;

    .page-header {
        h1 {
            /* Salt color */
            color: rgb(3, 169, 219);
            font-size: 56px;
            line-height: 36px;
        }
        img {
            width: 80px;
            float: left;
        }
    }
}

/* Set the fixed height of the footer here */
push,
footer {
    height: 60px;
}
footer {
    background-color: #f5f5f5;
    padding-left: 18px;
    padding-top: 5px;
    padding-right: 5px;
    p {
        line-height: 80px;
    }
    border-top: 1px-solid #e5e5e5;
}
.dash-container {
    .sidebar-nav {
        button {
            width: 100%;
        }
        margin-right: 15px;

    }
}
The magic tag we added in the template needs to be inited. Salt UI keeps all its tags in js/elements/init.js. Lets add our new tag for dashboard. Find the elem_map variable and add the new element like this:
js/elements/init.js
var elem_map = {
    exec:           require('elements/exec/exec'),
    dashexec:       require('elements/dashexec/dashexec'),
    exec_docs:      require('elements/exec-docs/exec-docs'),
    exec_results:   require('elements/exec-results/exec-results'),
    login:          require('elements/login/login'),
    minion_detail:  require('elements/minion-detail/minion-detail'),
    minion_list:    require('elements/minion-list/minion-list'),
    modal:          require('elements/modal/modal'),
};
Now it is time to write javascript and template for our new custom element dashexec. I made 4 buttons, 1 for each of the wanted opertations. The trained eye will quickly see that the buttons specify which targets, module functions and with what args the salt commands should be ran.
js/elements/dashexec/template.html
<form>
    <button type="submit" class="btn btn-primary"
        data-class-disabled="vm.inprogress"
        data-target="salt.demo.no"
        data-fun="state.sls"
        data-arg="salt-git-pillars"
        data-disabled="vm.inprogress">
        <i class="icon-magic" data-class-icon-spin="vm.inprogress"></i>
        Refresh pillar
    </button>
</form>
<form>
    <button type="submit" class="btn btn-primary"
        data-class-disabled="vm.inprogress"
        data-target="git.demo.no"
        data-fun="state.sls"
        data-arg="git-repos"
        data-disabled="vm.inprogress">
        <i class="icon-magic" data-class-icon-spin="vm.inprogress"></i>
        Update Git repos
    </button>
</form>
<form>
    <button type="submit" class="btn btn-primary"
        data-class-disabled="vm.inprogress"
        data-target="db*.demo.no"
        data-fun="state.sls"
        data-arg="mysql"
        data-disabled="vm.inprogress">
        <i class="icon-magic" data-class-icon-spin="vm.inprogress"></i>
        Update database
    </button>
</form>
<form>
    <button type="submit" class="btn btn-primary"
        data-class-disabled="vm.inprogress"
        data-target="web*.demo.no"
        data-fun="state.sls"
        data-arg="nginx"
        data-disabled="vm.inprogress">
        <i class="icon-magic" data-class-icon-spin="vm.inprogress"></i>
        Update webservers
    </button>
</form>
The template goes along with this javascript to let the magic happen
js/elements/dashexec/dashexec.js
/**
A custom element that turns carefully crafted form buttons into salt commands and renders result into a x-tree tag

@module saltui.elements
@submmodule dashexec

@event SaltExecution
**/
define(function(require) {
    'use strict';

    var template = require('text!./template.html'),
        rivets = require('rivets'),
        xhr = require('utils/xhr'),
        drawtree = require('./tree'),
        xtag = require('x-tag');

    var exec = {
        content: template,

        onCreate: function() {
            this.xtag.inprogress = false;

            rivets.bind(this, {vm: this.xtag});
        },

        events: {
            /**
            Submit the execution form via Ajax and draw the result using d3 drawtree
            **/
            submit: function(e) {
                e.preventDefault();

                var that = this;

                this.xtag.inprogress = true;

                /* Use the event to find the correct button */
                var button = e.target.querySelector('button');
                var lowstate = {
                    client: 'local',
                    tgt: button.getAttribute('data-target'),
                    fun: button.getAttribute('data-fun'),
                    arg: [button.getAttribute('data-arg')]
                };


                /* Clear content */
                document.querySelector('.main').innerHTML='<div class="results"><h4>Results</h4><x-tree><i class="icon-spin icon-sp
inner"></i> Running ...</x-tree></div>';

                xhr('POST', '/', [lowstate])
                .get('return').get('0').then(function(result) {
                    that.xtag.inprogress = false;
                    var tgt = document.querySelector('x-tree');

                    /* Clear target */
                    while (tgt.firstChild) {
                        tgt.removeChild(tgt.firstChild);
                    }
                    drawtree(result, tgt);

                });

            },
        },
    };

    return exec;
});
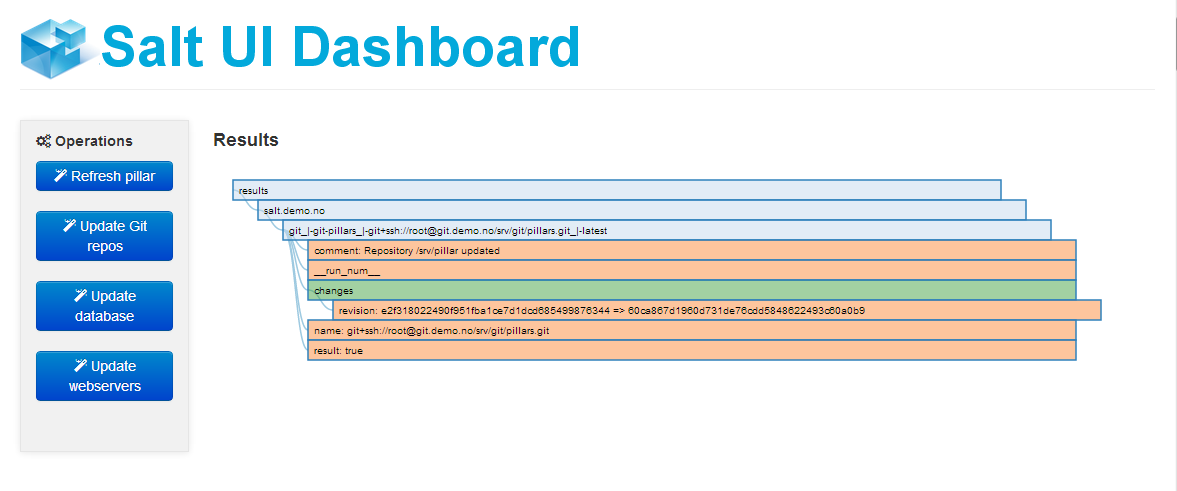
Drawtree is the function that turns the output from salt into a graphical tree. Think of it as a salt outputter for web. I modified the default tree a tiny bit to put some colors on result and changes, so the people pushing the buttons easily can see if every change went OK and what was changed. Much can be done with this outputter to render beautiful visualization on the changes. Change the tree.js color-function to look like this:
tree.js
function color(d) {
    if (d.name == 'result') {
        if (d.val == false) {
            return '#9d261d';
        }
    }
    if (d.name == 'changes') {
        if (d.children.length > 0) {
            return '#46a546';
        }
    }
    return d._children ? "#3182bd" : d.children ? "#c6dbef" : "#fd8d3c";
}
Screenshots
The dashboard welcome screen
The dashboard tree displaying the state output
Thank you for reading, feel free to email/twitter comments and/or suggestions !