09 June 2026
Reading Flexit ventilation data over WiFi
So I have a Flexit ventilation unit at home (the UNI 2), the kind with a CU60 controller and a CI600 wall panel that tells you the temperature and lets you bump the fan up when you're frying fish. Like any self-respecting geek I wanted those numbers in my own database and on my own dashboards, not locked behind a little wall panel in the bathroom.
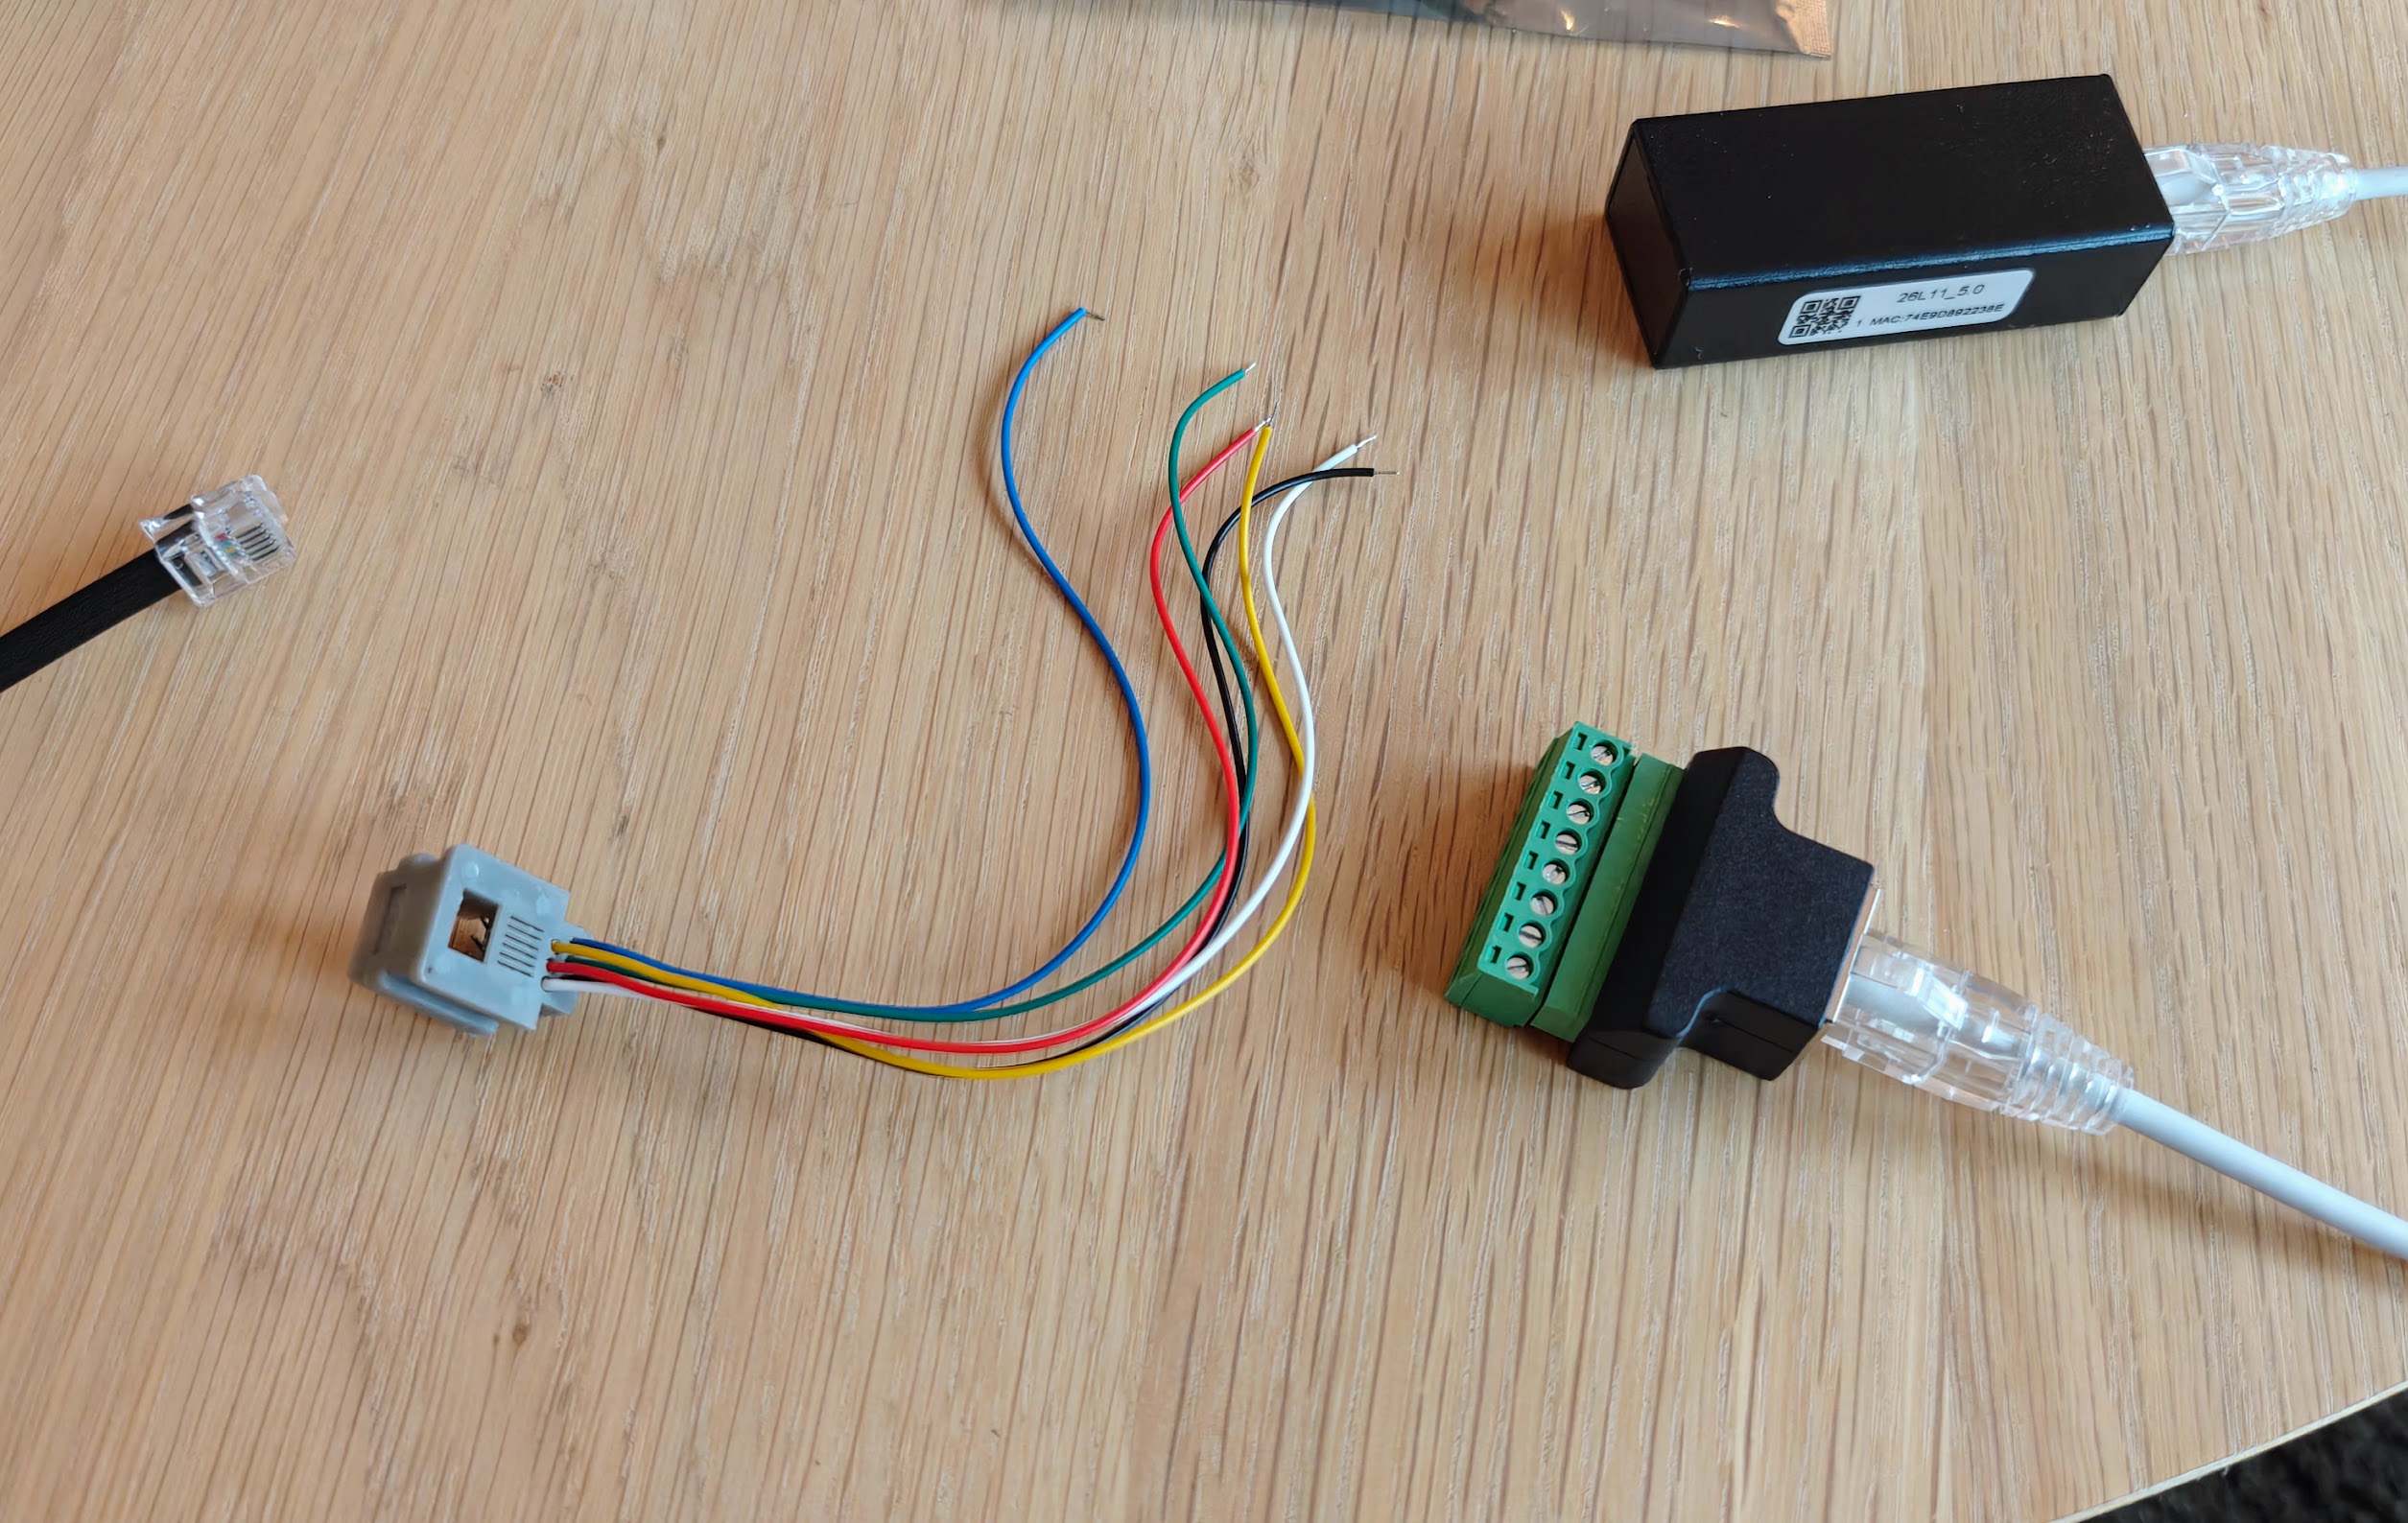
I found a nice ESPHome project, esphome-flexit-modbus-server, that pretends to be a Modbus server on the Flexit bus and exposes everything to Home Assistant. The catch: it expects an ESP microcontroller wired straight to the RS485 bus over UART. I didn't have an ESP lying around, but I did have an Elfin EW11 — a tiny RS485-to-WiFi/TCP bridge. Connect to its IP on port 8899 and you get a transparent pipe straight onto the serial wire. Surely I could just read the bytes and decode them myself? (and by myself I mean the AI)
The first thing I did was the laziest possible thing: connect a socket and print whatever fell out.
peek.py
s = socket.create_connection(("172.16.36.5", 8899), timeout=5)
print(" ".join(f"{b:02X}" for b in s.recv(4096)))
What fell out was garbage:
DF FF 83 55 AB E7 FB C3 3D FF FF FF E7 BD 03 A0 FF FF FF FF FF FF 8F ED ...
About 80% 0xFF, peppered with 0x55 and 0xAB. That alternating-bit pattern is the classic smell of a baud-rate or wiring mismatch — the UART is sampling the line at the wrong moments and aliasing real bytes into noise. The bus runs at 115200 8N1 and the EW11 was set to 115200 8N1, so baud wasn't it. After staring at it far too long, I swapped the A and B wires on the RS485 terminals. Of course. Suddenly:
00 01 4C 8C 55 4B ... 03 10 00 BE 00 55 AA ...
Real frames, starting with a slave address and a sensible Modbus function code. RS485 is a differential pair and I had the polarity backwards the whole time. Five minutes of rewiring beat five hours of clever software.
Now, the fun part. The Flexit CS60 bus does not respect the Modbus RTU spec. Proper Modbus delimits frames with a silent gap on the wire; the CS60 just blasts frames back-to-back with no gap at all. You can't split them by timing. Reading the ESPHome project's C++ I found they solve this with a custom frame splitter, so I did the same in Python: walk the byte buffer, work out how long each frame should be from its function code, and let the CRC confirm the boundary. If the CRC fails, slide forward one byte and try again.
the heart of the decoder
def expected_frame_length(buf):
    function = buf[1]
    if function in (0x01, 0x03, 0x04, 0x06, 0x65):
        return 8
    if function == 0x10:                  # write multiple registers
        byte_count = buf[6]
        return byte_count + 9             # 7 header + data + 2 CRC
    return 5 if function & 0x80 else 0    # exception, else resync
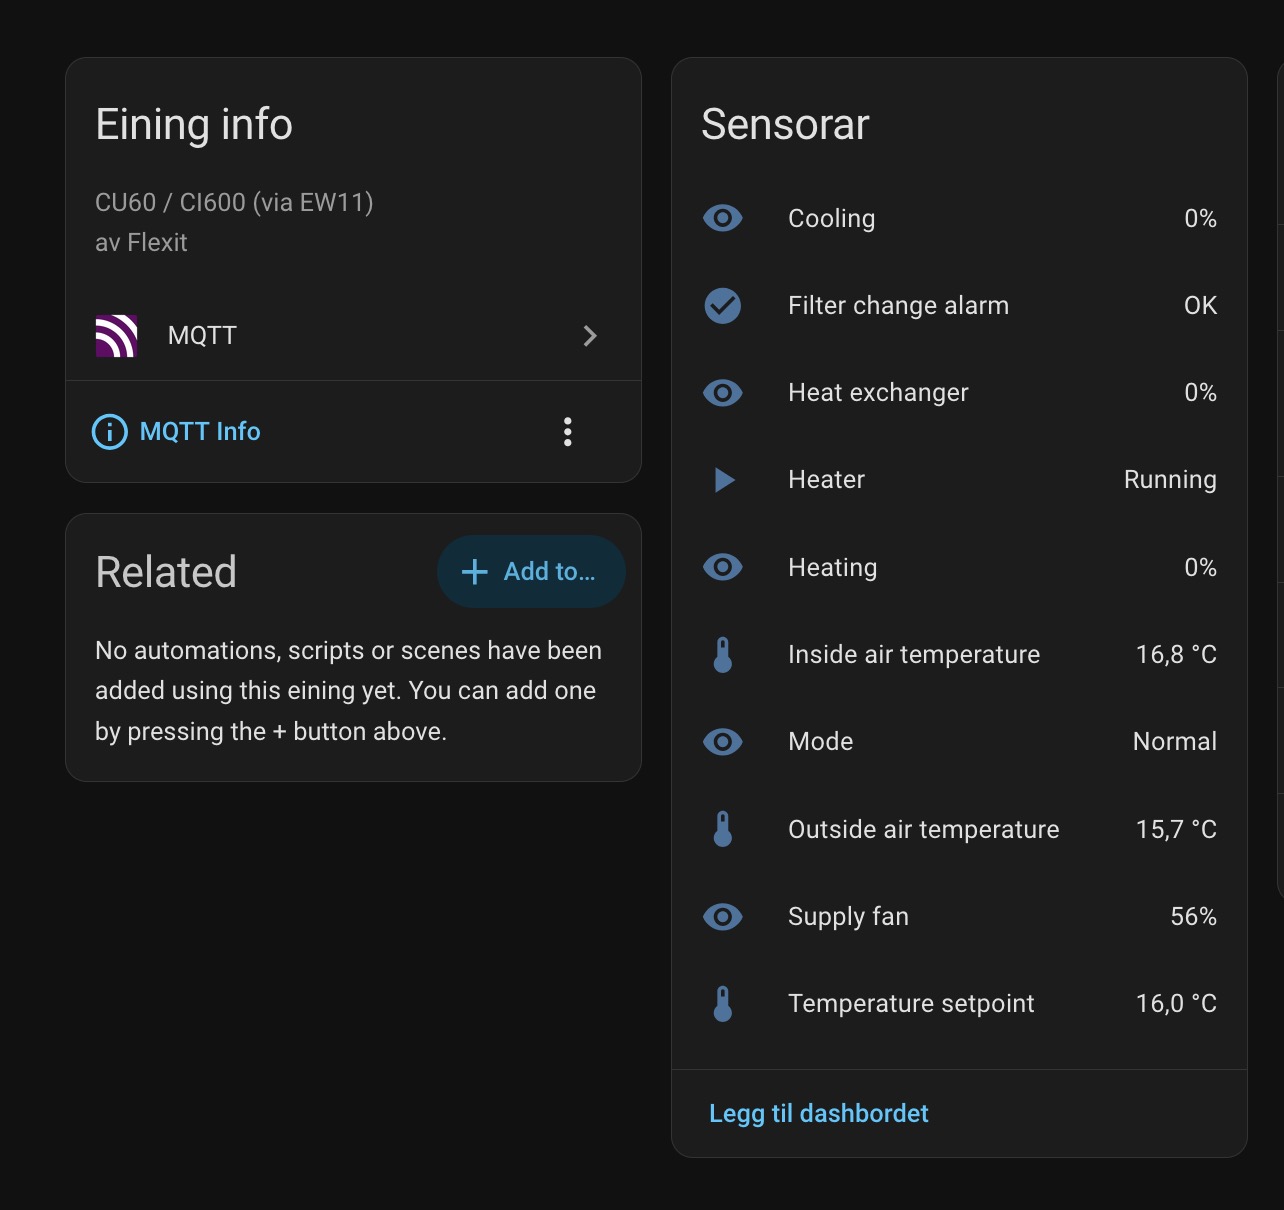
The CS60 is the master and it constantly writes the sensor readings out to the bus — one big "write multiple registers" broadcast (function 0x10) of 85 registers starting at address 0xBE, about nine times a second. So I didn't even need to ask for anything; I just had to listen and keep a table of the latest value at each register. The ESPHome project's header file conveniently documents what each register means, so a temperature is signed / 10, a percentage is the raw value, and so on.
Then came the satisfying bit: calibration against ground truth. I walked over to the CI600 panel, read off "set temperature 16, inside air 16, outside air 15", and checked my decoder:
0x00BE Temperature setpoint:    16.0 C
0x00C3 Inside air temperature:  16.5 C
0x00C5 Outside air temperature: 15.4 C
Bang on. I changed the setpoint to 26 and turned the heater on, and watched the heat-exchanger ("reclaiming") jump to 100% and the heating output ramp up — all reflected on the wire in real time. Nothing quite like watching your own bytes change because you pushed a button on the wall.
There was one register block I couldn't pin down: a row of "runtime" counters whose names in the project (RUNTIME_HIGH, RUNTIME_LOW, ...) I'd misread as 32-bit word pairs. A friendly nudge — those refer to the fan settings; the fan has three levels, Min, Normal and High (Max) — sent me back to the bus with an experiment. I stepped the fan through each level and logged which counter ticked:
[ 6.1s] mode=Min     WRITE MIN_LOW    +1
[16.1s] mode=Max     WRITE MAX_LOW    +1
[53.9s] mode=Normal  WRITE NORMAL_LOW +1
        (RUNTIME and FILTER tick every second, in every mode)
Tada! The active fan level's counter increments each second, while a separate "since reset" runtime and the filter-age counter tick continuously regardless of mode. The hardware told me what the labels couldn't.
With the protocol understood, the last step was to make it useful. I wrote (and by I, I really mean AI) a small publisher that listens to the EW11, decodes the registers, and pushes everything to MQTT with Home Assistant auto-discovery, so the whole unit shows up as a device in Home Assistant with no manual YAML. It prints a status line every time it publishes, which is oddly mesmerising to watch:
[11:52:19] Temperature setpoint=16°C | Inside air temperature=16.3°C |
Outside air temperature=15.3°C | Heat exchanger=0% | Heating=0% |
Supply fan=56% | Mode=Normal | Heater=ON | Runtime at Normal=8.6h ...
No microcontroller, no firmware flashing, no soldering — just a WiFi-to-serial dongle, four wires (eventually in the right order), and a couple of hundred lines of Python sniffing a bus that was happily broadcasting everything all along.
What I need now is an automation that yells at me when the filter runtime says it's time to change the filter 😜
You can find the decoder and the MQTT bridge in the scripts/ folder of my fork at github.com/torhve/esphome-flexit-modbus-server.
Enjoy!