25 January 2013
How I made a HTML5 virtualization UI on top of Salt Stack
AKA my libvirt cluster webgui proof of concept
Virtualization! Sorry, I meant Cloud! is probably the right word to use in these times, and every sysadmin, sorry, I mean DEVOPS-guy needs to write their own cloud solution, right? This page will explain how I built my small virtulization cluster using different free software tools. There exists a bunch of different free software solutions in this space already, OpenStack, oVirt, Archipel, Proxmox Ganeti. Some of these are based on libvirt, some are not. Some have invented their own communcation bus/agents. Most of them assume full control over your stack. They have varying requirements of your storage solution. Varying degree of requirements of the management server. My motivation was something more loosely coupled, easy to install (relatively), extremely flexible, and few assumptions about your setup. This entire solution can be ran on a single host, or some parts of the solution on VMs inside a single host. Or split over several physical machines. The poing being, it has very few required parts and is flexible. It's also meant to showcase the power of Salt combined with Salt API for builing neat interfaces on top of complex infrastructure The current featurelist is pretty short, it's basically just overview over hosts and VMs, simple VM control (console, start, stop). The most advanced feature is probably the drag & drop of a VM onto a host to do live migration of a VM The status of this is a the Proof of Concept stage, it's by no means any feature complete or mature contender to other solutions listed above. But I wanted to show that by relatively little effort one can build powerful solutions based on all the existing free software in this area by using Salt as the glue.
PS! There are screenshots at the bottom!
Components
- Physical host(s) running Ubuntu
- Salt Stack with Salt API
- My proof of concept single page web GUI
I write Ubuntu as a component since the states I use are using ubuntu-packagenames and ubuntu-servicenames and other assumptions made in the state-files. They can certainly be improved to support other targets Salt Stack is the piece of software that runs the show in this little setup. Salt is a configuration management and remote execution system. Salt API is a relatively recent addition to the Salt family that enables you to interface to the salt states/modules/commands using a REST API. The result is a very convenient way to write simple web applications to provide information and manage your underlying technology The PoC webGUI is a simple bootstrap-based page with a lot of "manual" jquery going on to interface with Salt API. I had to include Handlebar JS to atleast get some simple templating capabilities
Installation
First, I skip ahead to after you have installed Ubuntu successfully. The next step is to install salt. I am not going to reiterate the instructions found at the salt documentation site The rest of this page assumes you already have a working master with the hosts as minions. Then comes the state files for making the host a virt-host, and next the state file for cluster functionality. Clustering is required for using clvm which is a clusterd version of LVM. The CLVM is used to store the virtual machines on shared storage using Logical Volums as raw block devices, each guest gets one or more LV. If you don't have shared block storage, and for example use NFS or other storage instead, you can probably skip the cluster part. It can also be used a base for other cluster services as HA/GFS2/OCFS2/failover/etc. Here follows a listing of the state file for KVM functionality. It requires that you generate a ssh key that you put in the kvm state folder to be used for inter-host communication. If you are unfamiliar with salt states, these two states are Yaml files, with a little jinja templating logic. Salt reads these files and "pushes" the hosts into the desired state.
/srv/salt/base/kvm/init.sls
kvm-packages:
  pkg.installed:
    - pkgs:
      - bridge-utils
      - libvirt-bin
      - virt-goodies
      - virt-manager
      - virt-top
      - virtinst
      - virt-viewer
      - vlan
      - guestfish
      - guestfsd
      - guestmount
      - lvm2
      - nfs-common
      - qemu-kvm
      - python-libvirt
      - munin-libvirt-plugins
      - munin-node
      - multipath-tools

/etc/libvirt/qemu.conf:
  file.managed:
    - user: root
    - group: root
    - mode: 444
    - source: salt://kvm/qemu.conf
    - require:
      - pkg: kvm-packages

kvmhostkey:
  ssh_auth.present:
    - user: root
    - source: salt://kvm/id_rsa.pub

/root/.ssh/id_rsa:
  file.managed:
    - user: root
    - group: root
    - mode: 600
    - user: root
    - source: salt://kvm/id_rsa

libvirt-bin:
  service.running:
    - require:
      - pkg: kvm-packages
      - file: /etc/libvirt/qemu.conf
      - ssh_auth: kvmhostkey
    - watch:
      - file: /etc/libvirt/qemu.conf

vm.swappiness:
  sysctl.present:
    - value: 0

vm.zone_reclaim_mode:
  sysctl.present:
    - value: 0

net.bridge.bridge-nf-call-arptables:
  sysctl.present:
    - value: 0
/hugepages:
  mount.mounted:
    - device: hugetlbfs
    - fstype: hugetlbfs
    - mkmnt: True

{% set nfsmounts = {
{{
  '/mnt/iso':    '10.2.10.10:/mnt/iso',
  '/vm'     :    '10.2.10.50:/vm'
}
%}
{% for mountpoint, target in nfsmounts.iteritems() %}
{{mountpoint}}:
  mount.mounted:
    - device: {{target}}
    - fstype: nfs
    - mkmnt: True
    - opts:
      - vers=3
      - async
      - tcp
      - hard
      - intr
      - rsize=32768
      - wsize=32768
      - auto
      - noatime
{% endfor %}

grub-settings:
  file.append:
    - name: /etc/default/grub
    - text: 'GRUB_CMDLINE_LINUX_DEFAULT="console=ttyS0,9600n8 console=tty0 text nosplash nomodeset nohz=off transparent_hugepage=always"'
  file.append:
    - name: /etc/default/grub
    - text: 'GRUB_CMDLINE_LINUX="console=ttyS0,9600n8 console=tty0 text nosplash nomodeset nohz=off transparent_hugepage=always"'

update-grub:
  cmd.run:
    - name: update-grub
    - require:
      - file.append: grub-settings
Here follows a listing of the cluster state file.
/srv/salt/base/cluster/init.sls
cluster-packages:
  pkg.installed:
    - pkgs:
      - corosync
      - clvm
      - pacemaker
      - cman
      - fence-agents

/etc/cluster/cluster.conf:
  file.managed:
    - source: salt://cluster/cluster.conf.jinja
    - template: jinja
    - mode: 444
    - require:
      - pkg: cman

/etc/corosync/corosync.conf:
  file.managed:
    - source: salt://cluster/corosync.conf.jinja
    - template: jinja
    - mode: 444
    - require:
      - pkg: corosync

/etc/init.d/clvm:
  file.managed:
    - user: root
    - group: root
    - mode: 555
    - source: salt://cluster/clvm
    - require:
      - pkg: clvm


cman:
  service.running:
    - enable: True
    - watch:
      - file: /etc/corosync/corosync.conf
      - file: /etc/cluster/cluster.conf
      - file: /etc/init.d/clvm
    - require:
      - pkg: cman

clvm:
  service.running:
    - enable: True
    - require:
      - service: cman
The SLS-files references a few configuration files, these can be found at my state github repository, along with the code for the webpage.
Webserver, salt API and web page
For purpose of simplicity, the webpage and salt api lives on the master. Install nginx using states or otherwise. The nginx conf I use inside the web site is
server_name salt;
allow 10.10.10.0/24;
deny all;
index index.html;
root /srv/www;
location /api {
    rewrite ^/api/(.*) /$1 break;
    proxy_pass http://localhost:8000;
    proxy_read_timeout 120s;
}
This proxies commands to the api using prefix /api to the salt api running on the salt master. The salt API uses external authentication (PAM) to allow certain users to run a specified list of commands. My /etc/salt/master has these lines for that:
external_auth:
pam:
saltwebuser:
- test.*
- virt.*
- wsproxy.*
- grains.*
As you can tell, this requires the saltwebuser to exist to PAM. For example, create a local user called saltwebuser with a password. The web page will then use this username and password for its communcation with Salt. This could certainly be extended to user separate users for all the admin staff, or decouple the web login from the salt login, letting nginx handle the logon to the web page. The wsproxy is a websockify python program that comes as a part of the NoVNC HTML5 VNC client. I provide a simple salt module to start the websockify application on the host to proxy the VNC port to a websocket port The wsproxy.py module should be installed into your salt file root:
/srv/salt/base/_modules/wsproxy.py
#!/usr/bin/env python
'''
Support for websockify
'''

# Import python libs
import os
import argparse
import glob

# Import salt libs
import salt.utils
from salt.exceptions import SaltException


def __virtual__():
    '''
    Only load the module if websockify is installed
    '''
    if salt.utils.which('websockify'):
        return 'wsproxy'
    return False


def start(ws_port, target):
    '''
    Start a websocket proxy for a given port to a given target port

    CLI Example::

        salt '*' wsproxy.start 6080 localhost:5900
    '''
    cmd = 'websockify --run-once -D --timeout 30 --idle-timeout 30 %d %s' %(ws_port, target)
    out = __salt__['cmd.run'](cmd)
    return 'Started websockify daemon'
Screenshots, them shiny baubles
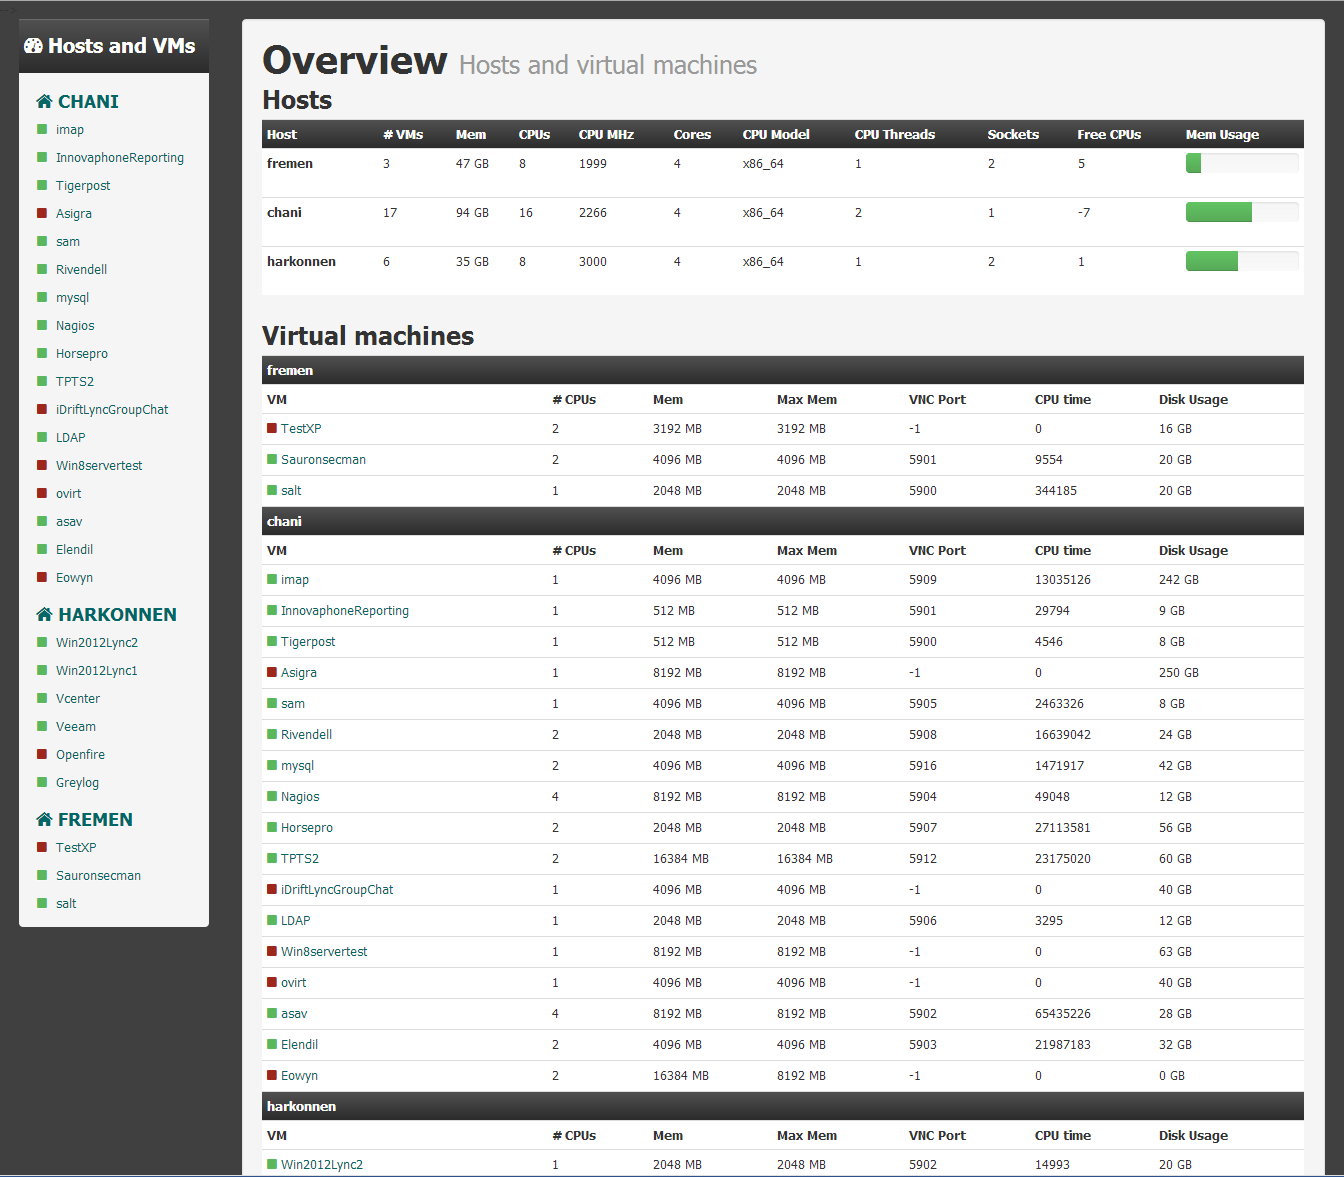
Overview for hosts and virtual machines
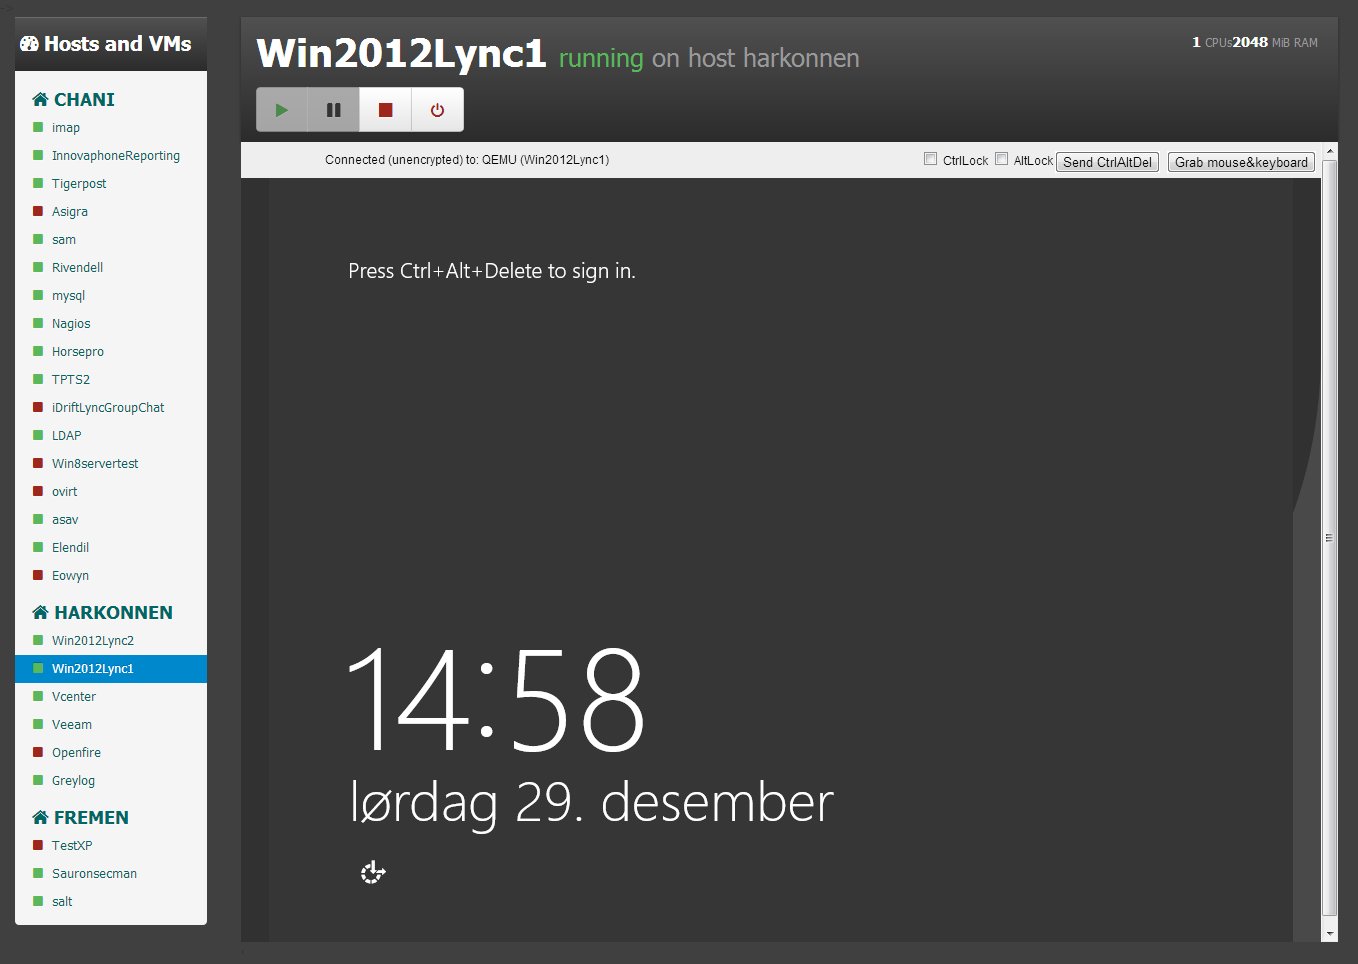
A single VM with a few controls and VNC javascript console for pluginless easy console access
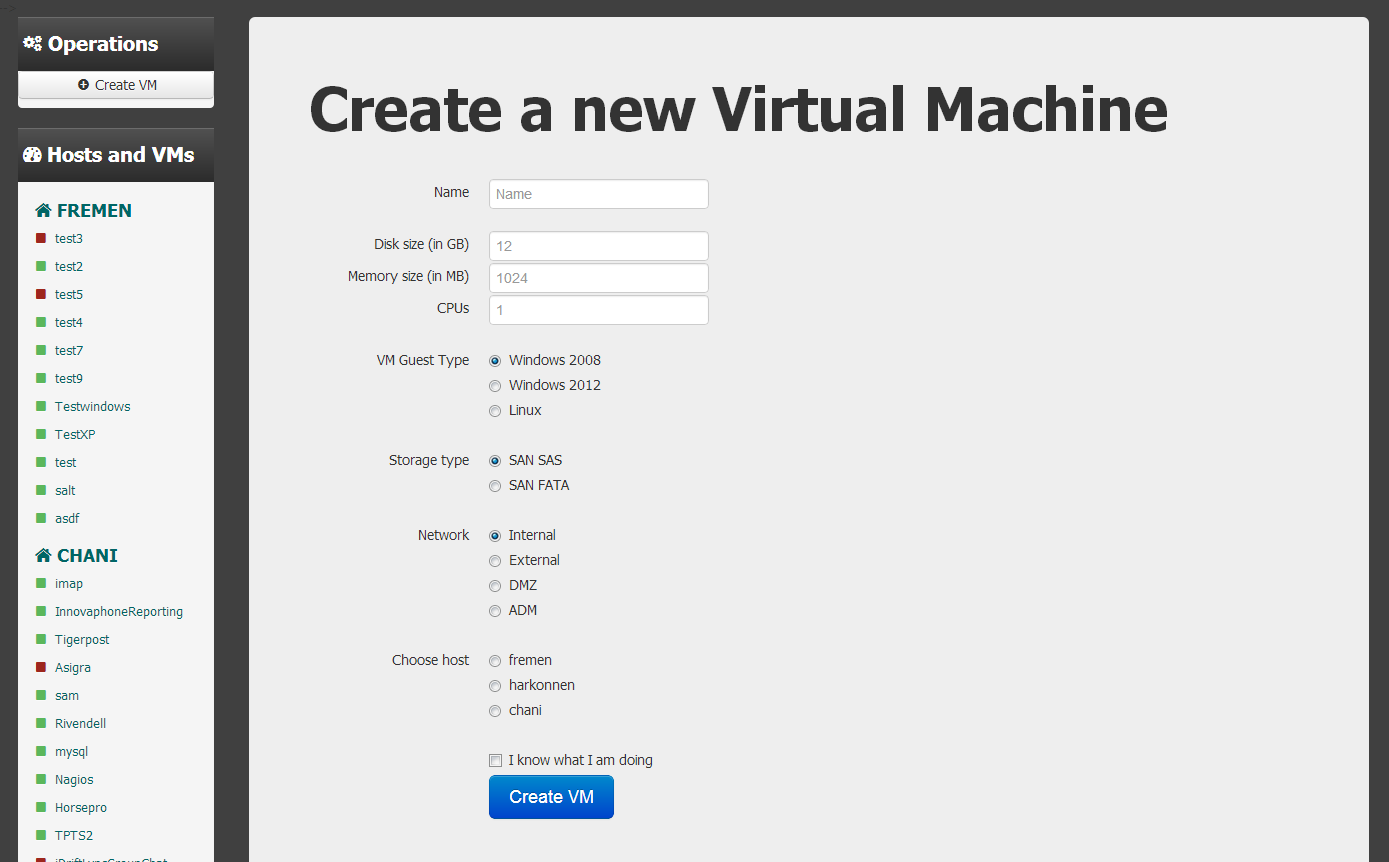
The new VM creation form with a couple of hard coded storage types and networks
That's all. Please contact if you have any comments, etc.